The case for automation is clear on paper. But results vary considerably depending on equipment choice, floor conditions, layout complexity, and how well the deployment is configured. This guide walks through exactly how to automate warehouse floor cleaning — including what to do before you start, the variables that determine whether it actually works, and the mistakes that cause most deployments to underperform.
Key Takeaways
- Automating warehouse floor cleaning follows a set sequence: assess your space, select equipment, map the facility, then schedule cleaning missions
- Whether your robot covers the full facility or leaves gaps depends on floor condition, layout complexity, and the navigation technology you choose
- Manual warehouse floor cleaning runs $0.08–$0.20 per square foot for basic industrial cleaning; automation targets labor-hour reduction, not just cost per square foot
- Warehouses with large, repeatable cleaning routes and consistent daily debris see the strongest ROI
- Skipping or rushing the mapping phase is the single most common cause of poor results
How to Automate Floor Cleaning in Your Warehouse
Step 1: Assess Your Warehouse Floor and Cleaning Requirements
Before selecting any equipment, document what you're actually dealing with. This phase directly determines every decision that follows.
Evaluate your floor surfaces:
- Identify surface types present — sealed concrete, epoxy-coated, unsealed concrete, tile
- Note cracks, uneven sections, or worn coatings that could affect navigation or cleaning head performance
- Autonomous scrubbers are designed for smooth to rough hard surfaces including concrete, tile, stone, and synthetic floors, but significant surface damage creates blind spots and premature brush wear
Catalogue your debris profile:
- Dry debris (dust, pallet chips, packaging fragments) → points toward a sweeper or combo unit
- Wet residue, grime, or liquid spills → requires a scrubber-dryer
- Mixed environments → a sweeper-scrubber combination unit handles both in one pass
Map your physical space:
- Record total square footage and identify zones with different traffic densities
- Measure aisle widths and rack clearances — these constrain which robots can operate autonomously versus which need manual handling
- Flag areas with high forklift activity, temporary staging, or frequent layout changes
This assessment isn't a one-time checkbox. It's the data you'll use to match equipment, define cleaning zones, and build a schedule that actually covers the facility.
Step 2: Choose the Right Automated Cleaning Equipment
Equipment type and specifications need to match the conditions you documented in Step 1.
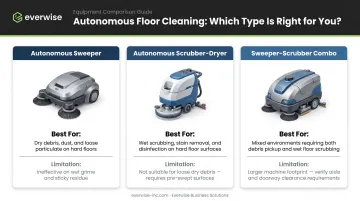
Understanding the equipment categories:
| Type | Best For | Limitation |
|---|---|---|
| Autonomous sweeper | Dry debris: dust, sand, packaging | Ineffective on wet grime or liquid residue |
| Autonomous scrubber-dryer | Wet scrubbing hard floors, removing adhered soils | Not designed for loose dry debris alone |
| Sweeper-scrubber combo | Both dry debris and floor scrubbing in one pass | Larger footprint; verify aisle clearance |
Key specifications to evaluate:
- Robot width relative to your narrowest autonomous-operation aisles
- Battery runtime versus total route length — most commercial autonomous scrubbers offer 4–6 hours of operation per charge
- Tank capacity for solution and recovery — larger tanks mean fewer interruptions during extended missions
- Navigation technology — more on this in the key variables section below
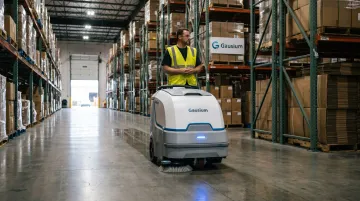
For Texas warehouse operators, Everwise Business Solutions distributes Gausium autonomous cleaning robots from their San Antonio and Pharr locations. The Gausium lineup (including the Scrubber 75 and other models) features AI-driven navigation with 3D depth cameras, intelligent floor identification, and zero-distance edge cleaning suited for industrial hard-floor environments.
For model selection based on your floor size and debris type, contact their team directly at 210.884.0559.
One rule that applies regardless of brand: never deploy a scrubber where the primary problem is dry debris, and never rely on a sweeper where there's grease or liquid residue. Equipment mismatches result in inadequate cleaning and accelerated wear.
Step 3: Map Your Warehouse and Configure the Robot
This is where most deployments either succeed or fail. Mapping is a real commissioning process. Expect it to take a full day or two, depending on facility size and complexity.
The mapping process:
- Walk the robot through the entire facility to generate an initial floor map
- Complete multiple mapping passes, especially in congested or narrow areas
- Validate coverage across all intended zones before running unattended missions
Configuring cleaning zones:
- Separate high-traffic areas, open floor lanes, and narrow aisles into distinct zones
- Assign cleaning modes or speed profiles appropriate to each zone
- Mark restricted areas (hazardous zones, charging bays, dock doors) as no-go regions
Safety and system configuration:
- Set obstacle detection sensitivity appropriate for your traffic levels
- Define speed limits near pedestrian zones and intersections
- Confirm the robot can reach its charging station from all zones before running overnight missions
- If your facility uses warehouse management software, consult your IT team about network security before connecting the robot — most autonomous cleaners require stable Wi-Fi for remote monitoring and schedule management
Don't skip validation runs with a supervisor present before switching to fully unattended operation. A missed corner during mapping becomes a permanently uncleaned zone during autonomous missions.
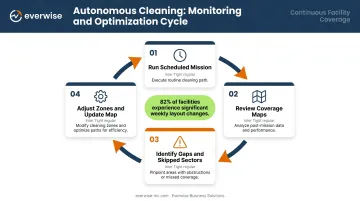
Step 4: Schedule Missions, Monitor Performance, and Optimize
Autonomous doesn't mean set-and-forget. The first 2–4 weeks are an active optimization period.
Scheduling principles:
- Run cleaning missions during shift changes, overnight windows, or low-traffic periods
- Avoid scheduling during peak forklift activity in zones with tight clearances
- Align mission frequency with actual soil accumulation — high-debris zones may need daily cleaning while lower-traffic areas may need less
What to monitor after each mission:
- Coverage maps showing cleaned versus uncleaned areas
- Skipped sectors caused by blocked aisles or obstacles
- Mission completion times — routes that consistently time out need to be split or shortened
- Debris bin status — full bins mid-mission reduce cleaning quality for the remainder of the route
Ongoing optimization:
- Adjust zone boundaries based on coverage gaps identified in reports
- Update the map whenever racking moves, new staging areas are created, or permanent obstacles change
- Increase mission frequency in zones where debris accumulation outpaces the current schedule
Avidbots' 2024 Autonomy Report found that 82% of facilities experience significant weekly layout changes — meaning map maintenance isn't optional in a live warehouse environment. Treat it as a routine task alongside brush checks and bin emptying.
What You Need Before You Start
Equipment and Space Readiness
- Repair significant floor cracks or potholes before deployment — surface damage affects navigation accuracy and cleaning head contact
- Confirm aisle clearances against the specific robot model's minimum operating width
- Identify a charging station location with accessible power and clear robot approach paths
- Gausium robots return to the charging station automatically when battery is low — the station must be reachable from every cleaning zone
Connectivity and Operator Readiness
- Verify stable Wi-Fi coverage across every zone — remote monitoring, schedule updates, and the Gausium Mobile App all require consistent connectivity
- Consult your IT team about network security protocols before connecting any robot to your facility network
- Designate at least one staff member responsible for robot oversight, basic troubleshooting, and routine maintenance tasks (debris bin emptying, brush condition checks, filter inspections)
- Ensure all relevant staff know how to pause or stop the robot — this is a non-negotiable safety requirement
Key Variables That Determine Cleaning Results
Two warehouses running identical robots can see very different results. The gap usually comes down to four controllable variables — and knowing them upfront prevents the most common deployment failures.
Floor surface condition Heavily worn, cracked, or uneven floors create navigation errors and incomplete cleaning head contact. Robots are calibrated for relatively consistent surfaces — significant irregularities cause missed coverage and accelerate brush or squeegee wear. Inspect and repair the floor before deployment, not after.
Warehouse layout complexity Stable, predictable layouts allow robots to build optimized routes that improve over time. Frequently reconfigured layouts — moved racking, shifting staging lanes, temporary obstructions — force constant re-routing and require regular map updates. Avidbots reports that most facilities experience meaningful layout changes weekly, which is why monitoring skipped sectors matters.
Cleaning frequency and scheduling Infrequent cleaning lets debris compact beyond a robot's suction or scrubbing capacity. Scheduling too frequently without open operational windows causes mission interruptions. The right cadence depends on actual debris volume and traffic patterns — food logistics, general distribution, and manufacturing-adjacent environments each have different demands. There is no single universal rule.
Robot navigation technology Navigation method directly affects how well the robot handles dynamic conditions:
- Landmark-based systems require stable reference points and struggle when layouts change
- LiDAR-only systems map well but can miss obstacles below or above sensor height
- AI-driven systems with 3D depth cameras perceive environmental changes in real time, update the internal map, and reroute around new obstacles — reducing missed zones without manual intervention
Common Mistakes When Automating Warehouse Floor Cleaning
Avoid these three mistakes that derail most warehouse automation rollouts:
- Rushing the mapping phase — A single quick pass produces missed zones, navigation failures, and inefficient routes. Multiple passes with validated zone boundaries are what make autonomous operation reliable from day one.
- Mismatching equipment to debris type — Deploying a scrubber where the primary problem is dry packaging debris, or a sweeper in a facility with grease and liquid residue, causes inadequate cleaning and premature wear. Match the machine to the floor conditions before purchasing.
- Skipping ongoing performance reviews — Autonomous cleaning requires active monitoring, not passive trust. Bins fill up, brushes wear out, and layouts shift. Without regular post-mission reviews, cleaning gaps accumulate undetected until the floor condition becomes a visible problem — and by then, rework is unavoidable.
When Automated Floor Cleaning Makes Sense (and When It Doesn't)
Strong fit for automation:
- Large open floor areas with repeatable cleaning routes
- Consistent daily debris accumulation requiring multiple cleaning sessions per week
- Facilities with dedicated cleaning labor whose hours could be redirected
- Operations where floor cleanliness directly affects safety compliance — same-level falls account for 66.2% of occupational falls, with 87.9% caused by floor and walkway conditions
Poor fit or limited ROI:
- Highly irregular floors with frequent structural damage
- Cleaning tasks requiring real-time judgment (hazardous spill response)
- Facilities cleaned only occasionally with no recurring labor cost to offset
- Very narrow or cluttered aisles that require manual operation regardless of robot capabilities
If your facility checks the boxes above, the next question is where to start. For mid-size and growing warehouses, deploying a single unit on the highest-traffic zones is a lower-risk starting point than full-facility rollout. Run the robot during shift lulls, overnight windows, or scheduled breaks. That way it works in parallel with your team rather than displacing workflows that still need human judgment. Measure coverage and labor impact over the first 60–90 days before scaling.
Frequently Asked Questions
Which device can clean your floors automatically?
Autonomous floor cleaning robots — including standalone sweepers and scrubber-dryers — are the primary devices used for automatic floor cleaning in warehouses. They use AI-driven navigation and sensor arrays to operate without a human operator, covering programmed routes on a set schedule.
How much does it cost to clean a warehouse floor?
Manual industrial cleaning runs approximately $0.08–$0.20 per sq ft for general cleaning, with hard-floor scrubbing ranging from $0.20–$0.40 per sq ft according to ISSA benchmarks. Autonomous robot investment is better evaluated against labor hours displaced rather than a fixed cost-per-sq-ft figure. Get a quote-backed ROI model from your vendor before comparing numbers.
What is an example of warehouse automation?
Autonomous floor cleaning robots are a strong example of facility-service automation in a warehouse context. They sit alongside material-handling automation such as AGV forklifts and automated storage and retrieval systems (AS/RS), though they operate independently of the material-handling equipment.
How long does it take to set up an autonomous floor cleaning robot in a warehouse?
Initial mapping and configuration typically takes one to two days for most facilities, with route optimization continuing over the first few weeks of operation. Larger facilities with complex layouts take longer; simple open-floor environments can be operational faster.
Can autonomous floor cleaners operate safely alongside forklifts and warehouse workers?
Modern autonomous cleaners use LiDAR and 3D depth cameras to detect and reroute around people and moving vehicles automatically. Operators should still establish traffic protocols, schedule missions during lower-activity windows where possible, and ensure staff know how to trigger an emergency stop.
What types of floors can autonomous cleaning robots handle in a warehouse?
Most autonomous warehouse cleaning robots are designed for hard, flat surfaces — sealed and unsealed concrete, epoxy-coated floors, tile, and similar materials. Always verify surface compatibility, minimum flatness requirements, and debris type against the specific robot model's specification sheet before purchase.