The challenge is that results vary considerably depending on how accurately the facility is mapped, how zones are drawn, and whether each area's cleaning parameters match its actual floor type and soil level. A hospital waiting room and a loading dock have almost nothing in common from a cleaning standpoint — treating them the same is one of the most common reasons deployments underperform.
This guide walks through every step of the zone programming process, what you need before you start, which settings most affect outcomes, and how to fix the problems that come up most often.
Key Takeaways
- Zone programming covers five steps: map the facility, set boundaries, configure parameters, schedule runs, and validate before going live.
- Most commercial robotic scrubbers use a companion app or cloud dashboard; no coding required, though solid facility knowledge matters.
- Water flow, brush pressure, travel speed, and no-go boundaries are the variables that determine cleaning quality per zone.
- Zone programming is ongoing: update zones whenever the facility layout, traffic patterns, or cleaning needs change.
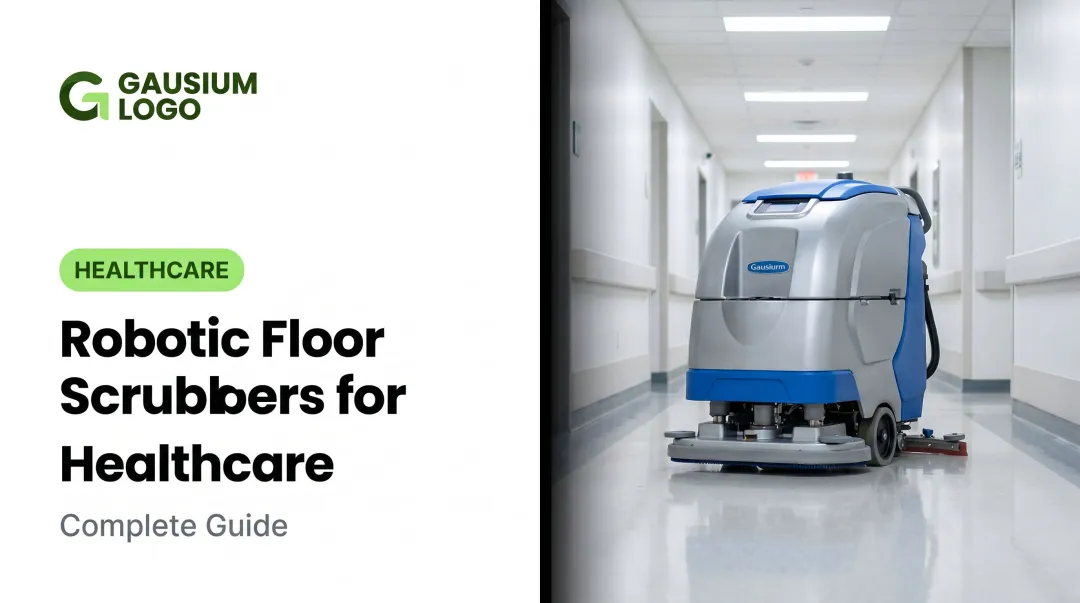
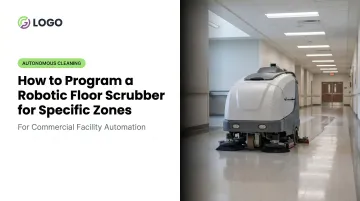
How to Program a Robotic Floor Scrubber for Specific Zones
Step 1: Initiate a Full Facility Scan to Generate a Base Map
Before any zone can be defined, the robot needs a complete digital map of the floor space. Most commercial robotic scrubbers — including Gausium models available through Everwise Business Solutions in Texas — initiate this process through a companion app or onboard interface, where the operator selects a "mapping" or "learning mode" and guides or releases the robot to traverse the facility.
Before starting the scan, confirm:
- All furniture and equipment are in their normal operating positions
- Temporary barriers or staging materials have been removed (unless permanent)
- Pathways are clear and consistent with everyday conditions
- Lighting is adequate throughout the space
During the scan, the robot uses a combination of LiDAR sensors, 3D depth cameras, and SLAM (Simultaneous Localization and Mapping) navigation software to build a point-cloud map of the environment. According to Gausium's deployment documentation, this process supports ±5 cm positioning accuracy and can handle map areas up to 60,000 sq m.
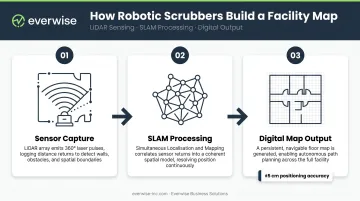
The quality of this initial scan directly limits zone precision. A map with gaps or distortions produces zones with gaps or distortions — errors at this stage carry through every subsequent configuration step.
Step 2: Review and Edit the Generated Map for Accuracy
The auto-generated map is a starting point, not a finished product. Before drawing any zones, review it inside the software dashboard and correct what the scan got wrong.
Common issues to look for:
- Corridors that weren't fully captured
- Two adjacent rooms that appear merged into one space
- Walls that are slightly offset from their actual positions
- Open doorways that the robot misread as permanent passages
Most companion apps provide tools to erase noise, straighten boundaries, and redraw wall segments. Permanent fixtures — columns, fixed shelving, equipment pads — should be marked as fixed obstacles at this stage so the robot never treats them as temporary obstructions to route around.
No-go zones should also be drawn here: areas around electrical panels, restricted rooms, charging station perimeters, and any space the robot should never enter regardless of what the schedule says. Gausium's mapping software supports virtual walls in line, polygon, and circular formats, giving operators flexible options for defining restricted boundaries.
Skipping this review is the single most common setup mistake. Zones drawn over an inaccurate map will consistently underperform.
Step 3: Define and Label Individual Cleaning Zones
With a verified map in place, use the software's zone-creation tool to draw cleaning zones directly over the floor plan. Divide by function, not just geography.
A main corridor, a cafeteria, a patient waiting room, and a loading dock may be physically adjacent — but they have different floor surfaces, different soil loads, and different cleaning requirements. Each deserves its own zone.
When defining zones:
- Name each zone clearly and specifically (e.g., "Main Entrance Lobby," "Kitchen Prep Floor," "Receiving Dock" — not "Zone 1," "Zone 2")
- Assign a priority level or cleaning sequence so the robot knows the order to tackle zones and how to route efficiently between them
- Draw zones to match actual physical boundaries, not approximate shapes
- Keep functionally distinct areas as separate zones even if it means more setup time upfront
Aligning zone boundaries with your facility's natural traffic patterns pays dividends over time. High-traffic zones run during off-peak hours; sensitive areas clean during low-occupancy windows.
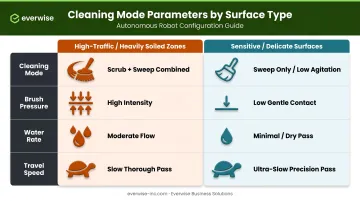
Step 4: Configure Zone-Specific Cleaning Parameters
Step 4 is where configuration determines actual cleaning performance. Each zone should have independently configured settings — applying uniform parameters across all zones ignores real differences between areas and typically results in over-cleaning some floors and under-cleaning others.
Core parameters to set per zone:
| Parameter | High-Traffic / Heavily Soiled Zones | Sensitive / Delicate Surfaces |
|---|---|---|
| Cleaning mode | Scrub + sweep combined | Scrub only or light sweep |
| Brush pressure | Higher intensity (deep clean) | Lower intensity (light or standard) |
| Water dispensing rate | Moderate — controlled for squeegee recovery | Low — minimize moisture near equipment or grout |
| Travel speed | Slower for more contact time | Standard, adjusted for floor protection |
For entryways, slopes, and areas with foot traffic during cleaning windows, lower water output and faster squeegee action reduce wet floor exposure time — an important consideration given that OSHA's walking-working surface standards require drainage maintenance and dry standing areas where wet processes are used.
Gausium's Vacuum 40 model includes an Intelligent Floor Identification feature — using 3D depth cameras and AI — that automatically adjusts cleaning mode and brush height when transitioning between floor types. This is useful at zone boundaries where, for example, a carpeted corridor transitions to a tiled lobby.
Step 5: Set Cleaning Schedules and Validate Performance
Scheduling: Assign time-based schedules to each zone, staggered so zones run sequentially rather than simultaneously. A single robot cannot clean two zones at once — scheduling conflicts cause missed runs or incomplete coverage. Align each zone's schedule with its lowest-traffic window: entrances during early morning, cafeterias after service hours, offices overnight.
Gausium's scheduling tools allow tasks to be configured by working days, start time, and execution frequency, giving operators the control needed to build a realistic weekly cleaning plan across multiple zones.
Validation: Before going fully live, run the robot through each zone individually and watch for:
- Sections of floor the robot consistently misses
- Path deviations from the expected route
- Incorrect parameter execution (too much water, brush not engaging)
- Early returns to dock before zone completion
Brain Corp's documentation notes that robotic floor scrubbers can typically be deployed within a few hours or days depending on facility scope — validation runs are part of that window, not an add-on.
Adjust map boundaries, zone parameters, or schedules based on what you observe before considering the deployment complete.
What You Need Before Programming Zones
Equipment and System Requirements
Not every robotic floor scrubber supports zone-based programming. Look for models that include:
- LiDAR navigation and 3D depth cameras for accurate mapping
- A companion app with zone management features (zone drawing, naming, scheduling)
- Cloud-based or remote scheduling capability
- A stable Wi-Fi connection or Bluetooth-accessible device for initial setup and map configuration
Gausium robotic scrubbers — distributed across Texas by Everwise Business Solutions — meet all of these requirements out of the box. The Gausium Mobile App handles remote management, schedule control, and zone configuration for models like the Scrubber 75 and Phantas. Contact Everwise at 210.884.0559 for model-specific zone programming details.
Facility and Operator Readiness
Facility conditions for accurate mapping:
- Furniture and equipment in their normal positions
- Temporary barriers removed unless permanent
- Mixed floor type transitions (tile-to-carpet, epoxy-to-concrete) identified in advance for correct zone boundary placement
Operator requirements:
- Working knowledge of the facility layout and cleaning priorities by area
- Familiarity with the robot's companion app interface
- Basic training from the distributor or manufacturer — no technical background needed
Key Parameters That Affect Zone Cleaning Results
Two facilities running the same robot model can get very different cleaning results — not because of the hardware, but because of how each zone is configured. Four parameters drive most of that difference.
Brush Pressure and Scrub Intensity
Set it too low on a heavily soiled floor and the cleaning is cosmetic. Set it too high on polished stone or waxed floors and you risk surface damage over time. Most zone programming interfaces offer preset intensity levels — light, standard, and deep clean — each selectable per zone without needing to enter manual pressure values.
Water Dispensing Rate
Excess water on smooth floors creates slip hazards and can work into grout lines or under equipment. Too little water weakens scrubbing action. Zones near entryways, slopes, or areas with active foot traffic during cleaning should use lower water output with faster squeegee action to minimize wet floor exposure.
Robot Travel Speed
Slower speeds increase brush-to-floor contact time and improve cleaning thoroughness. Faster speeds cover more area per charge cycle. The trade-off matters most in large facilities. Gausium's Scrubber 75, for example, is built for large-area coverage — sizing zones correctly against battery capacity prevents mid-route shutdowns and ensures each zone gets a complete clean pass.
Zone Boundary Precision
Imprecise boundaries cause two problems: overlap (the robot cleans the same section twice) and gaps (sections between zones go uncleaned). In narrow corridors and L-shaped rooms, the stakes are higher — a few inches off can leave a strip of floor untouched on every cleaning cycle.
Gausium's Zero-Distance Edge Cleaning feature addresses this directly. Using high-precision sensors and side brushes, it maintains consistent coverage right up to walls and corners, reducing the gap risk that loosely drawn zone edges create.
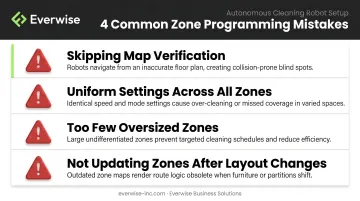
Common Mistakes When Programming Cleaning Zones
- Skipping map verification: Proceeding directly from auto-scan to zone drawing is the most frequent setup error. Zones drawn on an inaccurate map produce consistently inaccurate cleaning — the robot scrubs walls, misses sections, or gets stuck.
- Uniform settings across all zones: Using the same brush pressure, speed, and water rate everywhere ignores real differences in floor type and soil level. Over-cleaning some areas and under-cleaning others is the predictable result.
- Too few, oversized zones: Simplifying setup with one or two large zones forces the robot to apply the same settings to fundamentally different areas. Each functionally distinct area warrants its own zone.
- Not updating zones after layout changes: Moved shelving, new equipment, or reconfigured space can invalidate zone boundaries and send the robot into paths that no longer exist. Audit your zones any time the physical layout changes meaningfully.
Troubleshooting Zone Programming Issues
Robot Returns to Dock Before Completing a Zone
Likely cause: Battery depleted mid-route, zone is too large for one charge cycle, or an unexpected obstacle triggered a safety return.
What to check:
- Review battery logs against zone size and estimated run time
- Split large zones into sub-zones scheduled in sequence
- Clear or remap any obstacle that triggered the early abort
Robot Consistently Misses the Same Floor Section
Likely cause: The area wasn't captured during the initial scan (recessed corridor, alcove, area behind a door), or the zone boundary was drawn short of the actual floor edge.
What to check:
- Extend the zone boundary in the software to cover the missed area
- If the map itself is inaccurate, re-scan that section or manually correct the boundary before re-running
- Check for physical obstacles causing the robot to reroute — Brain Corp's documentation confirms robots may miss a spot after encountering an obstruction and deviating from their path
Water Pooling After Cleaning
Likely cause: Water dispensing rate too high for the floor type, or travel speed too fast for the squeegee to collect water effectively.
What to check:
- Reduce the water rate setting for that specific zone
- Decrease travel speed to give the squeegee adequate contact time
- Inspect the squeegee blade condition and hose routing — Tennant's T7AMR troubleshooting guide identifies an improperly coiled squeegee hose as the most common cause of water dripping back onto the floor after a pass
Frequently Asked Questions
What does configured zone cleaning mean for robotic floor scrubbers?
Configured zone cleaning means dividing a facility's floor map into distinct, individually programmed areas — each with its own cleaning settings, schedule, and boundaries. Rather than treating all floors identically, the robot applies the right behavior for each specific part of the facility.
Can a robotic floor scrubber be programmed for multiple floors or zones in the same facility?
Most commercial robotic scrubbers support multi-zone programming within a single floor. Select models also support multi-floor mapping, with separate maps saved per level and the robot transported manually or via service elevator. Gausium's deployment system extends this further with built-in elevator control management and cross-floor task support.
How long does it take to set up zone cleaning on a robotic scrubber?
Initial setup (facility scan, map editing, zone drawing, and parameter configuration) typically takes a few hours for a standard commercial facility, with validation runs adding additional time before full deployment.
Do you need Wi-Fi or internet connectivity to program cleaning zones?
Wi-Fi or a paired mobile device is required during initial setup and map upload. Once saved, most models run scheduled cleaning without a continuous internet connection, though LTE is typically needed to sync operational metrics and reporting data.
What is the difference between a no-go zone and a cleaning zone?
A cleaning zone is an area the robot is actively scheduled to scrub. A no-go zone is a boundary that permanently excludes the robot from a specific area, regardless of any cleaning schedule. Common no-go zones include equipment surroundings, restricted rooms, and hazard areas.
Can zone settings be updated after initial programming is complete?
Yes. Zone boundaries, cleaning parameters, and schedules can all be modified through the robot's companion software at any time. Updates take effect on the next scheduled run, so the robot stays aligned with how your facility actually operates.